Yes, worthy of shout-out-loud capitals, we have RIBBING on the CSM. I don't know why the thought of using the ribber struck fear in my heart, but the time was nigh to add this latest skill to my circular sock machine repertoire.
It's probably because every CSM forum features problems with the ribber as a main focus so much of the time that I was intimated by little bits of metal. Shame on me. It took me longer to find the dial adjuster lever that I had taken off and stored along with its screw in a Ziploc bag aptly tagged "Marie's Guts", which in turn was logically placed in a Rubbermaid bin where I store all the miscellaneous bits and bobs of my three machines. Sometimes, I amaze even myself with my organization, (sigh), because it took me over an hour to find. Then I misplaced the screw, and that must have taken me about another half-hour to locate...alas...a day in the life of...
I armed myself with my laptop, and for the umpteenth time, watched the YouTube video called Sock Machine Ribber Confidence. I like Laurie's approach. She's very cartesian in her logical, step-by-step explanations. Thanks to Laurie and her video, I plunked my laptop beside my CSM, popped the ribber on, followed her steps, and behold! We have ribbing:
I ran the tube off the CSM and put it in the kitchen for a show-and-tell when Eric returned.
And that's how my Anna Pepper came to be the best-dressed pepper mill in town. Haute couture for your pepper mill - Alessandro Mendini would be proud. Or maybe not, since I've turned his pepper mill into a Barbie?
So there's more ribbing in my future. I still need to get a lot of the finer details down pat before attempting to make a sock like the original Auto-Knitter sock that came with Albert, my first CSM:
I'm sure I'm months from being able to crank one of these babies off the sock machine, but at least the first steps have been made.
Friday, April 15, 2011
Wednesday, April 13, 2011
Chocolate Chip Cookies
Ahhh yes...the breakfast of champions:
My favorite orange cat mug filled with a cuppa steamin' Earl Gray and a couple of chocolate chip cookies. Probably everyone has made these before, and if you haven't, you have no clue what you're missing.
This recipe is the best of the best, crispy yet chewy and loaded full of chocolate chips. The trifecta of cookie perfection. If you happen to buy the 2.4 kg bag (I know, it's a piggish quantity!) of Chipits at Costco, well, the recipe's printed on the back. For those unable to lay their paws on a bag of Chipits brand chocolate chips, here it is:
Chocolate Chip Cookies
1 cup butter or shortening (I always use butter)
1 cup packed brown sugar
1/2 cup granulated sugar
2 eggs
1-1/2 teaspoons vanilla
2 cups all-purpose flour
1 teaspoon baking soda
1/2 teaspoon salt
2 cups semi-sweet chocolate chips
1 cup chopped nuts (optional - I didn't put any in)
Heat oven to 375 degrees F.
In a large bowl, beat softened butter, brown sugar and granulated sugar until fluffy. Beat in eggs and vanilla until creamy.
In a medium bowl, mix together flour, baking soda and salt. Gradually blend into creamed mixture.
Stir in chocolate chips and chopped nuts, if using.
Drop dough by tablespoons onto ungreased cookie sheet.
Bake at 375F for 10 to 12 minutes until golden brown.
Yield: about 4 dozen cookies.
I hadn't made these in years, and they were awesome. Scarfed 'em down in no time...don't tell anyone.
I've mentioned this before, but I have to say my trusty digital kitchen scale has revolutionized my baking. I always weigh my butter now, instead of using those not-so-precise cutting lines on the sides of the 1 pound butter packages we have here. 1 cup of butter weighs 227 grams or a half a pound. Easy as pie, or cookies, in this case.
My favorite orange cat mug filled with a cuppa steamin' Earl Gray and a couple of chocolate chip cookies. Probably everyone has made these before, and if you haven't, you have no clue what you're missing.
This recipe is the best of the best, crispy yet chewy and loaded full of chocolate chips. The trifecta of cookie perfection. If you happen to buy the 2.4 kg bag (I know, it's a piggish quantity!) of Chipits at Costco, well, the recipe's printed on the back. For those unable to lay their paws on a bag of Chipits brand chocolate chips, here it is:
Chocolate Chip Cookies
1 cup butter or shortening (I always use butter)
1 cup packed brown sugar
1/2 cup granulated sugar
2 eggs
1-1/2 teaspoons vanilla
2 cups all-purpose flour
1 teaspoon baking soda
1/2 teaspoon salt
2 cups semi-sweet chocolate chips
1 cup chopped nuts (optional - I didn't put any in)
Heat oven to 375 degrees F.
In a large bowl, beat softened butter, brown sugar and granulated sugar until fluffy. Beat in eggs and vanilla until creamy.
In a medium bowl, mix together flour, baking soda and salt. Gradually blend into creamed mixture.
Stir in chocolate chips and chopped nuts, if using.
Drop dough by tablespoons onto ungreased cookie sheet.
Bake at 375F for 10 to 12 minutes until golden brown.
Yield: about 4 dozen cookies.
I hadn't made these in years, and they were awesome. Scarfed 'em down in no time...don't tell anyone.
I've mentioned this before, but I have to say my trusty digital kitchen scale has revolutionized my baking. I always weigh my butter now, instead of using those not-so-precise cutting lines on the sides of the 1 pound butter packages we have here. 1 cup of butter weighs 227 grams or a half a pound. Easy as pie, or cookies, in this case.
Monday, April 4, 2011
An Ode to Spring
Spring has sprung,
and the grass has ris'
Now I know where the
dog poo is.
Buh-bye March. Don't let the proverbial door hit your arse on the way out.
I can hardly remember a colder March. Lots of snow, really cold temps and dreary, gray days. I haven't made an Easter tree in years, but this was the year I finally dug out my Easter decorations. Yes, I am aware I am a tad early, but I needed some brightness to restore my sanity. Growing up in a German household, we'd eagerly await the day we went out to our secret pussy-willow location and cut a few branches to decorate with hand-painted eggs. This year, I needed brightness now, so I marched over to the dollar store and bought a whack of fake forsythias and decorated them. I avoid fake stuff like the Plague, so I have to plead lack-of-spring induced insanity. Or something like that. But I'm done apologizing, I love my Easter tree, and so does the cat.
The snow is still not gone and probably won't be for a while considering the long-range forecast for the week, but the daffs at work are poking their heads out in a valiant effort. No signs of plant life here at the farm, not even the chives that grow against the barn wall have shown signs of resurrection.
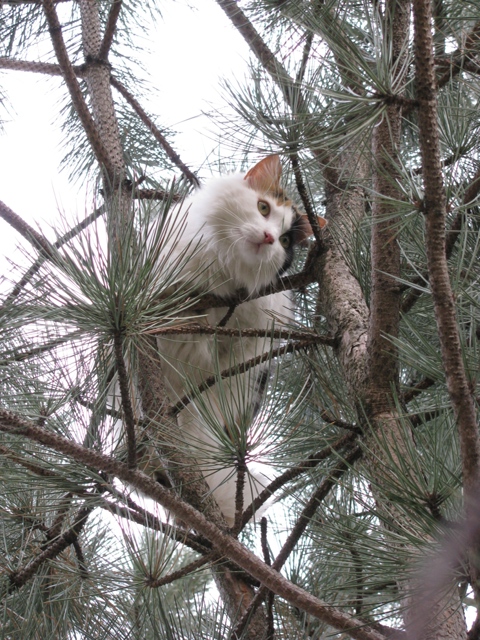
The Poppet, aka Popina, aka Weenie Popeenie loves to climb trees. Here she is in the pine tree, trying to work her way to the sky and a huge flock of Starlings:
Meanwhile, her sidekick, BobCat, sits below and patiently waits:
Schatzie knows better. She favours her sunbeam and has commandeered poor Cooper's dog-bed in the kitchen for one of her famous naps:
Pooper-scooping aside, it's a wonderful season of renewal and rebirth. The longer days are a true gift, and once we get a few warm days under our belt, the trees will start to show their greenery and Spring will really have sprung.
Then we'll start to complain about mowing the lawn again, the prohibitively high humidity, mosquitoes the size of helicopters, until we start dreaming of evenings spent by the wood-stove and the first snow fall of the season.
And so the cycle continues...
Tuesday, March 29, 2011
Regia Hand-dye Effect Yarn Review
I picked up a few skeins of Regia Hand-Dye Effect yarn in Germany last year, and this week I finally sat down and cranked out a few pairs of socks.
All I can say is I wish my suitcase were larger, my wallet bigger, and my foresight better.
The yarn is lightly spun and plied with a thin, black thread I thought the CSM would not like. Was I ever wrong.
This stuff went through the CSM like a hot knife through butter. And the colours?
They are beyond beautiful. This yarn is super-soft and fluffy on the skein, and when it's knit up, the fabric takes on a surprisingly coarse, almost scruffy feel. I soaked the socks in Eucalan, dried them near the wood stove, and once dry, they soften up immensely. The socks are very fluid and mold nicely to the foot.
Surprisingly, each skein weighed in at about 100g. I started each sock with a 3:1 mock-rib on the 72 needle cylinder, knit 38 rows, replaced the missing needles and hung the purl bump from the neighbouring needle on each empty one to prevent the little hole that would result, and knit 2 rows before hanging my hem. Then I knit 75 rows, turned my heel, knit 70 rows for the foot, and turned my toe. I have about 4g of wool left from each skein, so I probably could have eked out a few more rows, but I don't live that dangerously...
Speaking of living dangerously, little Popina does:
Here she is in the kitchen, sitting serenely beneath Victoria whose innards are about to receive a bit of a tune-up. I am going to have her cams brazed and reshaped, because she's a bit clunky. Without needles, she's as smooth as can be, but once I have needles in and start to knit, she feels a bit...well...clunky. I oiled her liberally, cranked out tube after tube, yet I don't feel she's at her best. Since I took her apart, cleaned her, and put her back together again, I observed the uneven wear on her cams first-hand and think the extra work and expense will be worth the trouble. So we'll be taking a trip to the machinist's workshop in the next few weeks, and I'll report back if my impressions are correct.
In the interim, I leave you with another view of Sockhenge:
Thursday, March 10, 2011
A Tale of Two Kitties
We're all well aware that the dreaded cat version of Cabin Fever is rampant and contagious here. BobCat needs a major nudge to get out the door, and isn't convinced that the same meteorological outcome is behind both the front door and the sliding door in the kitchen. If there's ever been a cat who's looking forward to spring, it's the Bobberizer.
Here Bob is on the path to the front door, looking up while watching the snow slide from our metal roof.
He had this very intent look on his face, and kept ducking down slowly as the snow fell in sheets from the roof. I love how one of his ears is always a bit off-kilter; it's like a little radar that rotates to the source of sound before his head has to move.
Weenie Popeenie has decided she loves the bathroom sink. She loves water, and especially dripping water. Good thing she can't open the faucets - yet!
I don't know why it has to be the bathroom sink, maybe it's the finish or the form or the warmth of the porcelain, but she can be found having her evening nap in the sink most days. She also fights me for the hot-water bottle I take to bed every night. She's quite the little diva, and of course we indulge her many little whims. How can you resist an angelic little face like that?
Here Bob is on the path to the front door, looking up while watching the snow slide from our metal roof.
He had this very intent look on his face, and kept ducking down slowly as the snow fell in sheets from the roof. I love how one of his ears is always a bit off-kilter; it's like a little radar that rotates to the source of sound before his head has to move.
Weenie Popeenie has decided she loves the bathroom sink. She loves water, and especially dripping water. Good thing she can't open the faucets - yet!
I don't know why it has to be the bathroom sink, maybe it's the finish or the form or the warmth of the porcelain, but she can be found having her evening nap in the sink most days. She also fights me for the hot-water bottle I take to bed every night. She's quite the little diva, and of course we indulge her many little whims. How can you resist an angelic little face like that?
Monday, March 7, 2011
Crankin' Time
Well, all I can say is this: Planetary Alignment has occurred. I have been crankin' (and crankin' and crankin') out so many socks that I have made a major dent in my sock yarn stash. I am at the point of ordering more wool...a shocking thought!
Here's my first completed pair:
These are knitted with Lana Grossa Meilenweit in an unknown colourway. They're not perfect, but I was pleased as punch to get these done!
And my second:

I gave these Regia Design Line by Kaffe Fassett (rhymes with Safe Asset, says the man himself...) in colourway 4255 to my Dad for his 81st birthday. To say he was pleased is an understatement. He knows just how much I have been tinkering with my CSM's over the past 2 years.
These were both knit on Marie, outfitted with the 72-needle cylinder.
In the past 2 weeks I have churned out 10 pairs of socks. Just as I had feared, it becomes somewhat obsessive, and I can think of little more than sitting at the CSM and cranking away.
My third CSM, Victoria, is currently outfitted with the 54-needle cylinder is still attached to the kitchen counter. I need to get this baby fine-tuned, but it's hard with the 72-needle cylinder getting so much love these days. I still have some issues with the fact the cams are well-worn on Victoria, and keep toying with the ideas of having them brazed rather than ground smooth. I'm still not sure which route to take.
I'm also not thrilled with the Legaré yarn topper and it's somewhat ridiculous yarn mast spring. The Auto Knitter is superior, in my opinion, and I'd love to find a few and put them on each machine.
I also found a great tutorial on the Circular Sock Machine Forum on Ravelry on purl-side kitchenering. I can't tell you just how much easier it is than knit-side kitchenering. Give it a try!
Here's my first completed pair:
These are knitted with Lana Grossa Meilenweit in an unknown colourway. They're not perfect, but I was pleased as punch to get these done!
And my second:
I gave these Regia Design Line by Kaffe Fassett (rhymes with Safe Asset, says the man himself...) in colourway 4255 to my Dad for his 81st birthday. To say he was pleased is an understatement. He knows just how much I have been tinkering with my CSM's over the past 2 years.
These were both knit on Marie, outfitted with the 72-needle cylinder.
In the past 2 weeks I have churned out 10 pairs of socks. Just as I had feared, it becomes somewhat obsessive, and I can think of little more than sitting at the CSM and cranking away.
My third CSM, Victoria, is currently outfitted with the 54-needle cylinder is still attached to the kitchen counter. I need to get this baby fine-tuned, but it's hard with the 72-needle cylinder getting so much love these days. I still have some issues with the fact the cams are well-worn on Victoria, and keep toying with the ideas of having them brazed rather than ground smooth. I'm still not sure which route to take.
I'm also not thrilled with the Legaré yarn topper and it's somewhat ridiculous yarn mast spring. The Auto Knitter is superior, in my opinion, and I'd love to find a few and put them on each machine.
I also found a great tutorial on the Circular Sock Machine Forum on Ravelry on purl-side kitchenering. I can't tell you just how much easier it is than knit-side kitchenering. Give it a try!
Labels:
albert,
auto knitter,
circular sock machine,
csm,
kaffe fassett,
lana grossa,
legare,
marie,
meilenweit,
regia,
socks,
victoria
Saturday, February 5, 2011
Seville Orange Marmalade - The Definitive Guide
After 6 batches, I think I have this Seville Marmalade business down to a fine art. I have made nearly 50 glasses of this stuff, and I have to say it beats any commercial Seville marmalade I've ever eaten. I took the best from David Lebovitz's recipe, and the best from the Canadian Living recipe, and rather than tell you why one is better than another, I just thought I'd show you my Shim Farm take on things.
Here's what I did:
Take 1 kilogram Sevilles (in this case 9 oranges), and slice them along their equator. Do the same thing to one Navel orange, and one lemon. (I didn't have any lemons today, so let's just pretend...)
I found it was easiest to squeeze each half thoroughly, and then use my paring knife to remove any stubborn, deep-seated pips. You don't want to go digging in with your fingernails. Your cuticles will not thank you at the end of the day. Just trust me and use a pointy knife, okay?
Then I cut each half in half again...
...and thinly slice each peel.
If you start with your pot in the kitchen sink, you'll make less of a mess. But you knew that already, didn't you?
When all the oranges are sliced, drain the pits over the pot. You need all that good juice...
...and add 8 cups of water to the pot.
Your pits contain the pectin needed to set the marmalade. You can tell the seeds are sort of slimy and gelatinous. That's the pectin and we want it! Wash a muslin cloth, and tie up the pits.
Be sure to use your best sailor's knot, because if this baby busts open, you're in for a pit hunt.
Trim the excess fabric using your trusty kitchen shears...
...and place the pits into your pot.
Bring oranges to a boil, and then reduce to a simmer. The thinner you've sliced the peels, the faster they will cook.
(I don't know where I picked up this long-handled stirrer, but my hands thank me when I cook a big batch of spaghetti sauce, or boil up a big vat of jam or marmalade, because you're well out of the reach of splatters. I've never seen one like it in stores, and all I know about it is that it's oak and made in Italy.)
I let my mixture cook about 40 minutes, until it had thickened a bit, and then let it cool for several hours.
Then I removed the pits and s-q-u-e-e-z-e-d all that wonderful pectin into the marmalade.
Add seven cups granulated sugar to the oranges, and bring everything to a full rolling boil, stirring constantly. Don't even let the marmalade sit on the burner for a minute without full attention. If you're called away from the stove, by all means remove it from the heat and attend to whoever is needy/whining/calling.

Stir until your arm falls off.
Kidding, but really, I stirred and stirred and stirred for at least 40 minutes until I reached the gelling point. My burner isn't quite at maximum heat, but it's close. At some point, the mixture becomes clearer and there are less little, teeny-tiny bubbles, and at this point you'd test for your gelling point. Put a small plate into the freezer, put a teaspoon of marmalade on it, and return it to the freezer. The marmalade should not run, but rather hold it's shape and wrinkle when you touch the edges. Keep testing until you've got this effect, or you'll end up with runny marmalade. That would be Not Good.
Towards the last batch, I was able to tell by the way the marmalade acted (it gets harder to stir because it gets thicker and there's more resistance) and the bubbles are bigger and "bubblier". I know you're impressed with my thorough description (bubbles are bubblier you ask?), but think of lava in the volcano and you're on the right track. Just trust me on this. I'm wearing an oven mitt in the above photo for a reason .
Prepare your 250 mL jars in boiling water...
...and put your lids in hot water to soften the sealing compound.

Fill your jars with hot marmalade, leaving a 1/4" head space.
Fasten your lids and rings until fingertip tight. That's to say, just tighten them, don't give them a super-torque.
Process for 10 minutes in your water bath.
This recipe made enough for 9 - 250 mL jars. Yes, there are only 8 in the pot above, and that's what I planned for, but we ended up with a bonus jar. If you're like me and have canned before, you know that all these canning recipes are mostly best guesses when it comes to the finished quantity. I always have a jar or two ready to sterilize, because that's the nature of the beast. I made this same recipe, using the same amounts, and the last batch made 8. Go figure. It was a gift from the Seville orange Gods.
That's it folks - that's ALL there is to it! Simple, easy, and oh-so-good Seville Orange Marmalade.
Here's what I did:
Take 1 kilogram Sevilles (in this case 9 oranges), and slice them along their equator. Do the same thing to one Navel orange, and one lemon. (I didn't have any lemons today, so let's just pretend...)
I found it was easiest to squeeze each half thoroughly, and then use my paring knife to remove any stubborn, deep-seated pips. You don't want to go digging in with your fingernails. Your cuticles will not thank you at the end of the day. Just trust me and use a pointy knife, okay?
Then I cut each half in half again...
...and thinly slice each peel.
If you start with your pot in the kitchen sink, you'll make less of a mess. But you knew that already, didn't you?
When all the oranges are sliced, drain the pits over the pot. You need all that good juice...
...and add 8 cups of water to the pot.
Your pits contain the pectin needed to set the marmalade. You can tell the seeds are sort of slimy and gelatinous. That's the pectin and we want it! Wash a muslin cloth, and tie up the pits.
Be sure to use your best sailor's knot, because if this baby busts open, you're in for a pit hunt.
Trim the excess fabric using your trusty kitchen shears...
...and place the pits into your pot.
Bring oranges to a boil, and then reduce to a simmer. The thinner you've sliced the peels, the faster they will cook.
(I don't know where I picked up this long-handled stirrer, but my hands thank me when I cook a big batch of spaghetti sauce, or boil up a big vat of jam or marmalade, because you're well out of the reach of splatters. I've never seen one like it in stores, and all I know about it is that it's oak and made in Italy.)
I let my mixture cook about 40 minutes, until it had thickened a bit, and then let it cool for several hours.
Then I removed the pits and s-q-u-e-e-z-e-d all that wonderful pectin into the marmalade.
Add seven cups granulated sugar to the oranges, and bring everything to a full rolling boil, stirring constantly. Don't even let the marmalade sit on the burner for a minute without full attention. If you're called away from the stove, by all means remove it from the heat and attend to whoever is needy/whining/calling.
Stir until your arm falls off.
Kidding, but really, I stirred and stirred and stirred for at least 40 minutes until I reached the gelling point. My burner isn't quite at maximum heat, but it's close. At some point, the mixture becomes clearer and there are less little, teeny-tiny bubbles, and at this point you'd test for your gelling point. Put a small plate into the freezer, put a teaspoon of marmalade on it, and return it to the freezer. The marmalade should not run, but rather hold it's shape and wrinkle when you touch the edges. Keep testing until you've got this effect, or you'll end up with runny marmalade. That would be Not Good.
Towards the last batch, I was able to tell by the way the marmalade acted (it gets harder to stir because it gets thicker and there's more resistance) and the bubbles are bigger and "bubblier". I know you're impressed with my thorough description (bubbles are bubblier you ask?), but think of lava in the volcano and you're on the right track. Just trust me on this. I'm wearing an oven mitt in the above photo for a reason .
Prepare your 250 mL jars in boiling water...
...and put your lids in hot water to soften the sealing compound.
Fill your jars with hot marmalade, leaving a 1/4" head space.
Fasten your lids and rings until fingertip tight. That's to say, just tighten them, don't give them a super-torque.
Process for 10 minutes in your water bath.
This recipe made enough for 9 - 250 mL jars. Yes, there are only 8 in the pot above, and that's what I planned for, but we ended up with a bonus jar. If you're like me and have canned before, you know that all these canning recipes are mostly best guesses when it comes to the finished quantity. I always have a jar or two ready to sterilize, because that's the nature of the beast. I made this same recipe, using the same amounts, and the last batch made 8. Go figure. It was a gift from the Seville orange Gods.
That's it folks - that's ALL there is to it! Simple, easy, and oh-so-good Seville Orange Marmalade.
Labels:
canadian living,
canning,
david lebovitz,
marmalade,
mason jars,
pectin,
preserving,
recipe,
seville orange
Subscribe to:
Posts (Atom)