Friday, January 9, 2009

Reno Day 3

Ms. Destructo here again, reporting in with the day's results.

Eric started to demolish the 1" thick boards that make up the proverbial "guts" of the interior. These boards are nailed to the 4" trusses that are hand-hewn out of trees and are part of the original structure of the house. Some of these trusses still have bark on them. These are the trusses that will be "beefed" up with the 4"x8" beams we had cut at our local sawmill.

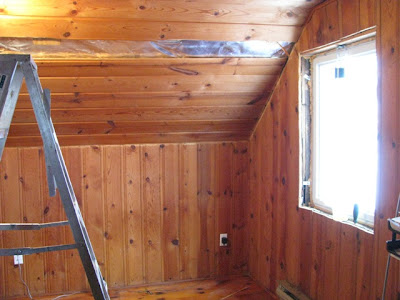
What you see in the above photo are the boards onto which the original roof made of cedar shakes was nailed. That roof is long gone, and was replaced with a metal roof that we re-did in 2003. When the roof was changed, some of these boards had to be replaced because they were rotten. This is why one of the boards in the above photo is lighter than the others, it is simply because the wood is newer. Over this the roofers placed 1/2" plywood, and then the metal roof. We chose a Vicwest roof, (VicElite style) because the screws are hidden. One panel snaps on top of another, hiding the screws that hold the metal panels down.

The above photo shows some frosty nails that hold the plywood from the roof down. It also proves our point, that when you hire people to do work for you and you supply them with explicit instructions, they don't always do what you ask them to. We asked them to screw down the plywood...and well...they nailed instead. It also proves another point: it's cold in there.


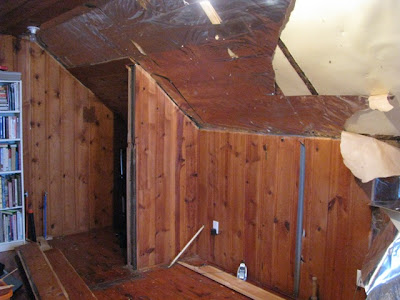
I invariably end up being the go-fer that gets to pry nails out of boards, wield the vacuum, and cut the wood for kindling. At then end of the day, the space looked like this:

Have no doubts: what we are doing here involves lots of hard work, lots of planning, and a keen sense of humour. Undertaking this kind of work is not for the faint of heart. At some point today, standing ankle-deep in sawdust, looking up to where a ceiling used to be, I had an Uh-Oh moment. That's sort of like an ah-ha moment; just a different magnitude.

I think Eric is having an Uh-Oh moment in the above photo. What you are seeing is the fibreglass insulation in the attic. The metal you see in the photo is BX cable, if you aren't familiar with it. All of the electrical wiring upstairs is BX for fire security.

We hope all of what we are doing here will be done for posterity. This house has good bones and bad make-up. We are trying to right numerous wrongs that have been done over the years, and in return, the house is thanking us for our hard work.

This old house has a heart and soul; it was here before we got here and hopefully it will be here after we are gone. In the interim, we take a philosophical approach to its care: we look after it and it looks after us.

Thursday, January 8, 2009

Reno Day 2

There is a story waiting to be told behind every wall in an old house. Behind the masonite/cardboard we are tearing down, the story is one of caution, and once again reaffirms our decision to tear everything down to the bare wood:

Behold the mildew! This is why you don't want to go slapping up Gyproc over unknown finishes. Once again, those people who say it just needs a coat of paint are delusional and just proves our point! Stuff like this needs to be attended to, and not glossed-over.

I love finding this kind of detail. Old fabric used as insulation to stop air infiltration. One can only imagine just how cold this house must have been before electricity and heaters.

In the meantime, I turned the wood we tore down into wood-stove sized boards. The wood is untreated, which makes it perfect to start the fire in the morning. You can also see the plumbing for the future toilet in the above photo.

The above photo shows another funky repair job. We have no clue what would have possessed someone to nail what we believe to be brass onto the pine flooring as a repair job. There are a couple of patch-jobs similar to this upstairs, and we have no clue what purpose they would have served, other than the "we had it, we used it, job done" philosophy.

The following photo makes me shake my head in disbelief:


$2.50? This molding dates back to the mid-70's! Seems pretty steep, considering this is maybe 35 years old. Minimum wage in Quebec in 1975 was $2.60 . Minimum wage in Quebec is now $8.50. One thing I know for sure: pine quarter round does not cost $8.50 today!

Slowly we are bringing the 4" x 8" beams we need to beef-up the walls into the house. They were milled for us by a local sawmill - our wood pusher, as I like to refer to him. Right now they are being stored smack in the middle of the living room. THIS is why we are still living with plywood floors downstairs.

These 4" x 8" beams will be joined to the original 4" x 4" beams using 9" lag-bolts countersunk into the 4" x 8". The idea is to have about 3" of lag-bolt into the original 4" beam, and 6" into the new 8" beam. This involves some pretty industrial drilling equipment, and would explain WHY we have a drill press standing in the living room. And if you don't know what a drill press is, consider yourself lucky, and if you do, you now know why I am up for the Patient Wife of the Year Award (first prize: a finished house!).

The way I see it, I can view this as a burden, or as a means to an end. I prefer the latter; it's a saner approach to life.

Wednesday, January 7, 2009

Destruction Day is Here!

The dreaded Knotty Pine Purge started today. Armed with a crowbar and hammers, Eric and I went wild upstairs, tearing down the pine tongue-and-groove paneling.

We started in the North-East corner:

In behind the knee wall we have yet more cold space. After ripping off the pine tongue-and-groove board, we found this waiting for us:

Aluminum insulation paper and painted masonite-type cardboard held in place by the most copious amount of finishing nails I have ever seen! Talk about inventive. Can anyone say "firetrap?"

Again, Eric and I shook our heads in wonder. The little wall in the above photo used to house a make-shift closet. There also used to be a bar (yeah, like a bar in a tavern) that extended out from this little wall. We tore it down along time ago. What you don't see is the plumbing for the toilet which is hidden behind the wall, and what you might make out are the pipes for the sink beside the bookcase we probably should have moved today (hindsight being what it is). This is where our future powder room will be. I can hardly wait.

We have no clue from what era this paneling (if you can call it that) dates. We imagine it was installed at the turn of the century, during a post-fire renovation. Historically, we know there was a fire in our house that burnt part of the roof at the turn of the century, so this paneling might date from the renovations of that period.

One thing about renovating an old house: you have to keep an open mind so when you find the unexpected, so nothing comes as much of a shock. We were expecting some type of plaster board, so finding the cardboard, complete with tiny finishing nails every 2 inches or so, was an almost happy turn of events. Disposal will be so much easier.

Once this cardboard was removed, we tore off a layer of tar paper, and we were at our next-to-last layer: 1" horizontal pine boards, nailed onto 4"x4" posts. We kept this layer intact, but it too will come down, just not today. Once these original pine boards are removed, Eric is building out the exterior wall with 4"x8" posts, insulating with 12" of Roxul fiber glass, re-installing the pine boards, adding a layer of Ayr-Foil, and finishing with 5/8" Gyproc. At least, that is the plan. What this means is that we will be living in a construction zone for the next few months.


You can see the sawdust that settled down between the layers of tar paper and board from the attic where it served as insulation. There wasn't just a bit of it, there was a lot of it:

Thankfully we own a ShopVac.

At the end of the day, we managed to remove about 1/2 of the paneling. We still have to finish this wall, hopefully tomorrow, and forge on along the wall as it continues into the spare room beyond. The entire space, complete with 2 bedrooms, measures about 26' x 30', so we have a bit of work ahead for ourselves. The partitions between the rooms will return to their relative places, and we still need to figure out where exactly the powder room walls will go.

The windows upstairs where replaced in 2001 with high-efficiency Argon-filled panes. The plumbing in Kitec was also done then. All electrical wiring was replaced with BX cables after we removed the sawdust in the attic. Telephone wiring and cable (despite the fact we're not hooked up) is also complete. Basically, all we are dealing with now is the removal of the layers of cladding, rebuilding and re-insulating the walls. I make it sound so easy, don't I?

We've been through this downstairs, so we know what to expect, save for any bizarre structural surprises.

The good news is the paneling is untreated, and makes the best kindling imaginable. I think we'll have a life-time supply by the time we're done renovating.

Monday, January 5, 2009

Cranky Works!

Well. I can hardly believe it. Cranky is all clean and happy, clamped to the kitchen island as a temporary measure. Observe:

Here's another photo of Cranky and some of his accoutrements:

I have a spare 80 needle cylinder, still in its original wrapping, a buckle and weights to weigh down the work-in-progress, 2 wooden bobbins for winding the wool on, and a very tedious, fussy set-up tool used to start the knitting that resembles umbrella guts.

Happily enough, the needles were lying in the mailbox this morning. This evening, I decided to knit a tube.

Here's my first attempt:

If you look closely, there are a few stitches in that piece, or should I say pieces? It didn't take me long to call it a loss and cut the work off the set-up tool. I think I kept the set-up tool too high in the cylinder, and in my excitement, I forgot to hook the weights on the bottom of the set up tool, which resulted in the knitting working its way up the cylinder and dropping, err, almost every stitch. So, scratch that off the record. It's only a bit of left-over wool, and my patience pit hasn't run dry yet, so I gave it another shot.

Success:


I actually managed to knit a tube, and if I can say so myself, the tension isn't half bad!

If the wool hadn't run out, the tube might have ended up...like...miles long! There is something completely meditative in the degree of concentration it took, and the output it gave. I could have cranked, and cranked, and cranked...

I have a new appreciation how this hobby can become addictive. Very addictive.

Today, a tube, tomorrow...a heel?

Sunday, January 4, 2009

Happy Sunsets to you...

You know you've got it good when sunsets are a distraction in your life. I must have taken 20 or so shots of the sunset on Saturday, January 3rd. Here's the one I am presenting you with:

Every so often, the sun creates a shaft of light upwards as it meets the horizon; this is not the camera playing tricks because it's really there. I can't help but be mesmerized every time this happens. The wind was blowing the fine snow across the fields, giving the surface an almost lunar quality. It was freezing cold again, about -15C, so this shot was taken through the window, hence the little bit of reflection in the glass. Next time I'll don a winter coat and some boots and fumble with mitten'd hands for a cleaner shot. Promise.

Saturday, January 3, 2009

Cleaning Mr. Cranky

Mr. Cranky's ribber attachment arrived in a separate parcel on Christmas Eve. Perfect timing, since I was morose that Eric had to work, and to add insult to injury, a crappy cold kept me from socializing to my heart's content. So, I threw a couple of sausage rolls into the oven, poured myself a glass of ginger ale (my Christmas treat - no pop allowed in this house otherwise), and donned my rubber gloves.

The ribber unit is complex, so I decided to cut my CSM teeth by cleaning it first. My resounding attitude: I might as well get the worst over with first. CSM boards advise cleaning the machines with mineral spirits or Marvel Mystery Oil, but my conscience won't let me purchase consumer products marketed with the word "mystery". As for the mineral spirits - where are they supposed to go but down the drain? Thanks but no thanks, our sceptic flora might not like that too much. It's also the middle of winter, and the windows in the kitchen are frozen shut. Using mineral spirits in an un-aired environment is a migraine guarantee. Again, thanks, but I'll pass.

I recently bought a citrus-based cleaner called Citra-Solv, a powerful degreaser that is sceptic-tank friendly to boot, so I figured I had nothing to lose by trying it. (And what this product does for stainless steel appliances cannot be described and must be experienced first-hand. If I won the lottery tomorrow, the first thing I would do is rip out our stainless cooktop and put it at the road with a sign that says: TAKE ME, PLEASE!)

Armed with the Auto Knitter manual I downloaded in PDF format from Angora Valley's website, and Yellow River Station's CSM Cleaning Instructions, I was ready to rock and roll.

My first step was to take the ribber apart. No problems there, save for removing the switch pin (part H-8 in the parts list). I was a bit stumped. I grabbed the micrometer, and took some measurements. Hmm. The switch pin is not tapered, which was my initial suspicion. That meant I could remove it from either end, but it would not budge. Finally, I oiled it, waited a bit, mulled over my options, and grabbed a motivator. That's a Shim Farm code-word for hammer.

Yeah. A hammer.

I gently tapped the pin, shielding it with a shim until I had success! (We keep shims lying around all over the house, they keep all sorts of stuff from squeaking, falling over, opening up, really, if you lived in a house as crooked as ours, you'd understand the usefulness).

The underside of the tappet plate looks like this:


I can't go into details about how it works; I understand the fundamental rudiments, however, even with the manual in one hand, the ribber in the other, without the needles in work, I'd be scratching my head if I had a free hand. I am sure once I get my needles it will make sense, but for now, my main concern was to clean it, not analyze its engineering.

During this exercise, I discovered I had a part missing, namely the driving pin, (part H-3). We keep a machinist on speed-dial (no joking!) so this is not a problem. In a pinch, a 1/4" Allen key can be used.

I buffed all parts. I took some 600-grit wet sandpaper and gave all stainless parts a gentle cleaning. This removed any rust spots, and with a liberal coating of oil and proper storage, rust formation will be inhibited. Any parts that had original finish on them were treated with Citra-Solv, maintaining the integrity of the enamel. The enamel is surprisingly tough; all I needed was to dip an old toothbrush into the solvent and scrub away. Good as new.

I dried all parts, oiled everything liberally, and reassembled the whole shebang.

This is what the ribber looks like now:


And another view from the side:


The ribber is mighty purty, if I may say so myself...

I ordered new needles for both the ribber and CSM from Angora Valley's site above. They were mailed out on December 22, however, between Canada Post and Canada Customs duking it out to see who can give us the crappiest service, it might take a while for the shipment to get here. The needles are the proverbial missing link I need to try out the unit and tweak it before I actually get to knit something.

I can hardly wait!

Friday, January 2, 2009

The Taming of Baby Grey

Baby Grey came to us in May 2005 after our elderly neighbour, Mr. Lefebure, passed away. Baby Grey is the son of Schatzie,who, if you were paying attention, runs our household. The "Old Hag" is over 20 years old. Baby Grey has to be a year of so younger, because as the legend goes he was from her first and only litter.

Baby Grey has been a barn cat his entire life. Well, until this week, that is:


This was the week Baby Grey decided to move in.

Baby has been a streak on the landscape since his little carpet was moved from Mr. Lefebure's shed and into our barn beside the house years ago. He was the most wild and untameable cat I have ever had. We barely saw him, we couldn't touch him, the only indication we had of his existence was an empty cat food bowl at the end of the day.

Most of our friends didn't even know we had 2 grey cats, they thought Schatzie and Baby Grey, if they caught sight of him, were one and the same.

But Schatzie caught on quickly; she soon gave up the great out-of-doors as her stomping ground, and decided to move into the house. For the past 2 years or so, she doesn't even entertain the idea of going out. Only on the sunniest, warmest days does she poke her nose outside, and then only under our supervision, because she is quite frail and defenseless compared to our other bruisers who are all nearly double her size. Schatzie likes her indoors schedule: a nap in the Catnip Convertible bed by the wood stove, meow plaintively for special expensive wet food for her consumption only, receive petting therapy. She then goes on what we call the day shift: after breakfast (more special wet food), Madame bolts upstairs with a burst of energy, settling in on our bed for the day. She will only come downstairs at dinnertime, and so the cycle continues...

Schatzie is opportunistic: she has never met a lap she didn't like. Most of our friends humour her, and leave our house covered in cat hair, muttering silently under their breath. Schatzie has that kind of baby-fine hair that gets into your eyes, and clings on every conceivable surface. Thankfully, Schatzie loves to be vacuumed, otherwise the already copious amount of cat and dog hair I have to beat back each day would be even more voluminous. My attitude regarding dog and cat grooming is, if the pet tolerates vacuuming, I might as well vacuum the animal directly, bypassing the floor as the inevitable resting ground for the masses of fur. With 3 cats and a dog, seemingly all I do some days is vacuum, vacuum and vacuum some more. Other days I don't even try to keep up, and I pay the price. Better to vacuum a bit every day is my resounding attitude.

But back to Baby.

I used to feed him in the barn. That meant going outside, which is fine in the summer, but not-so-fine in the winter. I started to move his bowl towards the patio door, and he caught on quickly. From the step in front of the patio door, he started to venture slowly inside. In the summer time, I'd leave the patio door wide open, and keep his food inside. He would come in, eat hastily, and leave again. In the winter, this proved more challenging: he would bolt the minute he saw anyone, but slowly, ever so slowly, he started to trust us. Sometimes he would let me pet him as he ate, then suddenly, he stopped eating as I petted him, and focused only on how nice it felt to be petted. Then I started to brush him, a completely new sensation once again. It took several years, but finally, we were starting to tame Baby Grey.

Several days ago, after coming in to eat, I forgot about Baby Grey. Normally he meows to be let out after eating, but this day, I think Baby Grey finally decided we weren't out to get him. Maybe inside wasn't such a bad place, after all. He settled down on the dining room chair, and that's where he spent the night. I keep a litter box for him in the barn which I know he uses, so getting him to use the litter box in the house was not a problem. He's started to hang around a little bit more every day, and most definitely prefers the great out-of-doors to inside, however, he is a pretty good example of perseverance paying off.
Related Posts Plugin for WordPress, Blogger...