Monday, March 31, 2008

The Attic Face Lift

Where others have bats in the belfry, we had sawdust as insulation. We kept the fire department on speed dial, if you know what I mean! Both Eric and I watched as our child-hood homes went up in flames, so we err on the side of caution, edging so far as neurotic where fire prevention is concerned.

Our ancestors might have been frugal in their approach to creative uses for sawdust so we have to commend them on this, but it’s also a prime reason there are so few old houses standing today. Even our house caught fire at the turn of the century, and you can still see the scars on some of the trusses, but luckily the house wasn’t a total loss.

This is what we were faced with:
Eric drew the short straw and ended up doing the first phase of the dirty work: removing the pink fibreglass insulation and tar paper that was on top of the sawdust.
At this point, my job was clear: I was the lucky dog who simply stood below the hatch to the attic and carried the full garbage bags outside. We picked the right season, it wasn’t too hot in the attic, and it wasn’t too cold either. The winds weren’t howling, so that kept the dust to a minimum, but either way, there was enough of it, and it ended up ALL over the house by the time we were done. This kind of job requires steel-toed boots, a mask (preferably full-face), and safety glasses.
After the removal of the pink insulation and tar paper, we got out our weapon: our industrial shop vac. Thank you Sears, for making a product we can wholly recommend. We bought a longer hose from a pool supply company that we duct-taped to the original hose, and keeping the shop vac on the floor below, I became the official shop vac emptier. This involved emptying the canister into the garbage bags, a concept that sounded great in theory but crashed and burned in practice.
We were also overly optimistic with regards to how long this whole process would take. We figured a day and a bit. It ended up taking about 100 man-hours. Thanks to one of our friends who was voluntold, the job actually became memorable. Sometimes, there’s a thankless task to do, and someone steps up to the plate to help, and we remember those people fondly. They also get food and beer, lots of food and beer. This is the kind of job you have to experience, because words and pictures just don’t do it justice.
Since we only had one vacuum to remove the sawdust, and 2 people in the attic, my wheels got turning. I remembered we had a garbage bag holder-open thingie, for lack of a better technical term. I even managed to find it in one of the out-buildings. I gave this to the guys, along with a plastic dust pan, and this effectively doubled our sawdust output. In fact, it was even faster than the vacuuming method, since it saved me from having to turn off and empty the vacuum every couple of minutes. Less downtime. It was also cleaner, since the bags could be closed upstairs in the attic, and all I needed to do was hump them down the ladder. I could even wait until several bags had to be removed from the attic, giving me ample time in between to act as a gofer. Really, the only downside is that it was less entertaining, since I missed watching the mummified mice whizzing through the clear plastic hose.
Each bag was schlepped down stairs and onto the front lawn, and it soon became clear that the garbage truck was NOT going to be taking this load. I don’t even think we could have bribed them with a flat of beer. Even if we put out 2 bags a week, the removal would have taken well over a year! When all was tallied, we used 140 industrial garbage bags that weighed 50 pounds on average (yes, I got the scale out and randomly weighed). That’s nearly 7,000 pounds weighing our old lady down.
At the end of the first day, people were slowing down, wondering what kind of a hovel we lived in to merit so many garbage bags on our lawn. What could we possibly be doing in there?
Since the attic wiring was now totally visible, it was time to re-wire the entire upstairs and put BX cable in the attic. We saw a few mice too many to cheap out on wiring for this space. Once that task was completed, the attic was reinsulated with R40 pink fibreglass. Our conscience is clear, our heat loss little.
This is also one of those discouraging, back-breaking chores that remains completely unseen. After coughing up dust-balls and itching all over for days, people ask, “So, what were you up to this weekend?”, and nothing you can say can adequately describe the task. So much of the work with an old house is hidden, and so many details remain unnoticed to outsiders. And emptying the attic of sawdust was one of those thankless tasks.

Saturday, March 29, 2008

Homemade Pasta, Anyone?

I have to admit, I had coveted the KitchenAid pasta roller for a long time, and when I found it on sale at Canadian Tire, I knew I had to strike. I haven’t regretted the purchase, so if you’ve been dreaming, do yourself a favour and make this acquisition a reality. I’d been asking Santa for quite some time, but my requests fell on deaf ears. (Santa, if you’re listening…well…you know the ice cream maker? It’s next on my list…)

Making pasta is simple: flour, salt, eggs and a bit of water.
I’ll walk you through the painfully easy process.
We’re 2 people, so I use the rule of thumb of one egg per person. That’s to say, if you’re four people, simply double the recipe below.
Here we go:
Homemade Pasta
1¾ cups flour
1 teaspoon salt
2 eggs
1 tablespoon water
Use the KitchenAid paddle attachment for this step:
Place flour in bowl with salt, mix well. Beat egg in a measuring cup, add water, and add this egg mixture to the flour. Mix well.
You will have a shaggy mixture. Stand back and let the mixer do it’s work. Slowly, the mixture will become more homogenous. Depending on the weather, you might need to add some more water or flour; I invariably end up adding more water.
Change from paddle to kneading attachment, and your dough will start to look like this:
When the mixture is smooth to the touch, and doesn’t stick to your fingers, you’re ready for hand kneading. Simply knead the dough until it’s elastic and smooth. You’re hands will tell you when you're done, but a minute or two should suffice.
Wrap your dough in some plastic wrap, and let it rest in the fridge for an hour or so. I tend to flatten my dough into a round flat shape.
I cut the dough into slices as such, since I find this facilitates the rolling process:
Flour the board and the cut pieces a bit so nothing sticks, and cover these resting pieces with your plastic wrap while you’re rolling your first piece:
The KitchenAid pasta roller makes quick work of the dough. You always start with the largest opening, so set your machine to setting 1 on the dial. I always pass the dough through about 5 or 6 times at setting number one. Some advocates stress the dough should be folded in half along the width, however I find this step tedious and useless. I just keep feeding it through again and again. You will find the pasta becoming smoother and sturdier. Adjust your machine to setting 2 and pass the dough through again, 2 or 3 times should do it. For fettuccini, I always go to setting 4, for spaghetti, I use setting 5.
While I am rolling, my pasta sheets need somewhere to do. I forgo the broom-handle-over-a-pair-of-chairs à la nonna, and simply let mine rest over the handle of my wall oven. It works for me, and the cat seems to enjoy it as well.
The KitchenAid pasta roller comes with 2 cutters, one for fettuccini, the other for spaghetti. Tonight we’re having Fettuccini Carbonara, so I’m using the larger cutter:
(It's always helpful to have a cat attentively watching you; Howard is actually waiting for some catnip to magically appear...)

Et voilà, a meal fit for a king! Your pasta is now ready for a pot of boiling salted water, and doesn’t need to cook for longer than a minute or two. Watch like a hawk, and drain when al dente. Serve immediately with your favourite sauce.

Friday, March 28, 2008

The Stairway from Hell

Our old staircase was a blight in an otherwise wonderful living room. Let’s face it, we were ashamed. People would invariably come into our house, and their crest-fallen face would hone in on our staircase, and they’d exclaim, “Ugh, what are you going to do with THAT?”

They were right of course, the old staircase was an eyesore:


Everyone’s first question: why don’t you just repaint it? Then the next question was equally impractical: why don’t you re-build it?

Nearly every baluster was broken, the steps had been sanded into oblivion, the stringers had separated where the stair turned 90º, and initially, in our optimistic view to restore things to order and out of sheer respect for “the old way”, we thought we’d rebuild it exactly as it was.

And then we thought things over. We couldn’t fit a king-sized bed upstairs, (which we needed, of course, to accommodate the DOG sleeping with us), a sofa barely fits upstairs, and basically, the over-all dimensions were kind of Lilliputian in scale. People were smaller 150 years ago. We’re no giants, but really…the stair need super-sizing to bring it up to par.

In the general scheme of our renovation, the staircase was the absolute LAST thing we wanted to do. We still need to renovate the upstairs, (we’re living in uninsulated knotty pine purgatory), and this would mean lots of trips up and down with what we’ve torn out, plus all the building material we need to bring up. Doing this with a pristine staircase is just too impractical. But when we happened on a hand-worker who was able to make a staircase to our exacting specifications, we deviated from our schedule and gave the green light. Big Mistake. Actually, we wanted him to repair our barn, but since it was November and winter was nipping at our heels, we thought it best to put the plans for the barn off until spring. Being suckers, when he told us stairs were his specialty and the fact he was desperate for work, we gave the go-ahead.

It was the end of November, and we were assured the whole fiasco would last about 2 to 3 weeks. Perfect, just in time for Christmas, I thought. I already had visions of pine garlands decking our fine new stair, our new pride and joy being shown off to Christmas revelers.

Alas, nothing ever goes to plan, and from experience, we know that every best time estimate can be doubled, if not tripled in length of time until completion. But, this time we reckoned, we were dealing with a pro, a master craftsman, an enthusiastic worker who came to us like manna from heaven.

We ordered oak for the steps, used our reclaimed Eastern fir for the stringers, and ordered 30 custom-turned balusters made of ash. Our worker became more and more sporadic, and weeks turned into months…

But alas, when we went into the workshop, we were mollified. The steps were wonderful, the design of the stringers was curvaceous and elegant, the balusters veritable works of art. We could hardly wait for the installation.

At the beginning of March, the day to tear down the old stair and re-build the wall was finally here. Eric and the stair-builder demolished the old stairs, tore out the bead-board that was our inside finishing, and proceeded to remove the pine boards that form the guts of our very uninsulated outside wall. Essentially (and this is where I laugh when people suggest “it just needs some paint”), the inside walls of our house are comprised of pine boards, about 1” thick, nailed vertically onto the main structure of the house with hand-forged nails.


After 150 years or so, the wood has shrunken so much you can literally pull the square nails out without effort. I didn’t mention insulation, did I? That’s because there is no insulation! Eric painstakingly removed all the old pine boards, replaced those that were rotten, placing one layer of heavy-duty tar-paper behind them.


He then re-installed the boards with screws and washers, and build a 2”x3” stud wall that was insulated with Roxul Flexibatt and covered with a vapour barrier called Ayr-Foil:


On top of this came the fire-code Gyproc, and we now have us a finished wall.

The only thing missing is the stair.

In the meanwhile, our two tough boy cats, Bobby (below) and Howard, high-tailed it outside, and spent their time looking longingly into the house through a variety of windows, in the hopes the stairs have magically rebuilt themselves.


Our ancient cat Schatzie is pushing 20, and she spent the entire time sleeping within 20 feet of power tools and wrecking bars, completely oblivious to the commotions around her. We spend a total of 3 nights climbing the ladder to sleep upstairs, and the old hag was the only cat who climbed the ladder. Mind you, the moment she discovered the stair was missing, it was as though a little light bulb went off above her head. It was as though she was saying, “damn, where’d the stair go? How am I gonna get my treats?” When I showed her the ladder, up she went. The old girl is fearless. (Her mother’s not, so I promptly slung her over my shoulder and carried her back down, where she spent the next 2 days sleeping on the sofa, opening an eye from time to time to watch the show.)

When the bottom stringer was placed against the wall, we could envision the stair as almost complete:


But we have a problem, and it’s starting to dawn on Mr. Stair-builder: he messed up a measurement. His calculations were bang-on; he should have had 19.85 cm between each step:


It seems when he started to build the stringers, he measured 18.85 cm between each step (remember Norm Abram’s advice: measure twice, cut once?). Now, you’re saying, 1 cm, that’s like…a fraction of an inch, right? And you’re right of course, but when you multiply 1 centimetre over 14 steps, you’re off by 14 centimetres.

So, our new stair is on blocks, and we’re not, um…very pleased. In fact, we’re near tears:


We’re scratching our heads, trying valiantly to find a solution, but alas, there’s no salvaging the hard work. There’s not enough room to properly add a step or build a landing. The run of the stair is totally wrong. Not only that, the 4th stair up is 10 cm higher than it should be because of the measuring error, meaning anyone over 6' needs to duck under the beam. One of our friends put it best: you’ll break a hip when you’re older. And, of course, she’s totally right.

Naturally, being the lyrical deviant I am, Pat Benatar's song "Heartbreaker" came to mind, sung with the following lyrics:

You're a hip-breaker, time-waster,
money-taker, don't you mess around with me,
OH NO NO NO...


Despite the best of intentions, not everything turns out like you’ve planned. Some things you have to live with and other things just need to be re-done.

But we’re not finished yet! We’ve been VERY patient over the past few months, dealing with a moody yet methodical worker. Eric was willing to absorb the cost of the wood: we’d need new stringers and new oak posts, as well as the banister. The actual steps could be re-used and so could the balusters, however, everything else needed to be re-built. We were willing to house our worker (hell, I was already feeding him 3 squares a day and doing his laundry), until the staircase was re-built, alas, his head-space "wasn’t there" and he was "too disappointed" to tackle the project again.

So. We have a beautiful staircase. It’s just built for the wrong house.

Thursday, March 27, 2008

Let's Bake a Cake!

The recipe for this cake comes from a dear friend in Germany. I love this cake because it's easy, keeps well (make it a day ahead for best flavour), and is infinitely versatile. I've used almonds, hazelnuts, and walnuts, as for liqueurs, I've tried Amaretto (great with almonds), rum (amazing with walnuts), kirsch (nice with walnuts) or Grand Marnier. The last time I made it with Grand Marnier, I even used 70% dark chocolate with orange flavour. It was amazing!

Lots of people ask me for the recipe, so here it is!

Krümeltorte (Crumb Torte or Cake)

200 g butter
250 g granulated sugar
5 eggs, separated
1 package vanilla sugar
(I use Dr. Oetker, each pouch contains 1 to 2 teaspoons vanilla extract, according to the Dr. Oetker website)
25 g cornstarch
100 g flour
2½ teaspoons baking powder
100 g ground nuts (natural almonds, hazelnuts, walnuts, etc.)
100 g dark chocolate, ground

For the filling, you will need:

500 mL 35% whipping cream
2 packages Dr. Oetker vanilla sugar
3 - 4 cL liqueur, such as Kirsch, rum, Amaretto or Grand Marnier
1 tsp. cocoa (I usually use more like 1 tablespoon)

For the cake:

Preheat oven to 325ºF

Prepare a 10" spring-form pan by greasing and lining bottom and sides with parchment paper.

Beat butter until creamy, add sugar, vanilla sugar (or extract) and egg yolks. Mix dry ingredients together (flour, cornstarch, baking powder, ground nuts and ground chocolate) and add to butter mixture. Beat egg whites until stiff and fold under mixture. Turn into prepared pan and smooth top with a spatula. Bake for 50 minutes in a 325ºF or until tester comes out clean. (With my new wall oven, it took only 45 minutes, despite the original recipe saying 60 minutes, so there's a moral in there somewhere).

Let cake cool on a rack, and remove parchment from sides and bottom. I recommend you put your cake on the plate you plan to serve it from, unless you have a cake lifter.

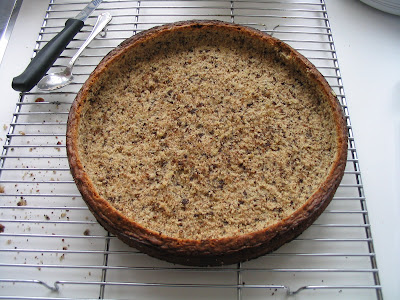
Here's where things get interesting: you will now remove the inside of the cake! Using a sharp knife, make a cut around the top of the cake, about a ¼" from the edge, and remove the inside using a spoon BEING SURE to keep a base of about a ¼". Your result will look like this:


Put your crumbs in a large bowl, and using your hands, make sure no large crumbs remain. To this you will add the 3 - 4 cL liqueur of your choice, and the cocoa. The goal here is not to SOAK, but to MOISTEN the crumb mixture. Taste it, and you will know if you should add more liqueur or cocoa powder. Remember, when the cake rests, your liqueur flavour will become more pronounced, so you might want to err on the side of caution. I don't even measure anymore, I just pour!

Now, THIS NEXT STEP IS VERY IMPORTANT:

Reserve 1¼ cups of the crumbs in a separate bowl for the topping, and put this aside. These crumbs will decorate the top of the cake AFTER the reconstruction.

Beat your whipping cream, adding vanilla sugar or essence, and FOLD the mixture under your crumbs (repeat: NOT the ones for the topping). Your mixture will look like this:


You will now RETURN this mixture into your base, as such:


Flatten out the mixture, being sure to fill in the edges of the base. Using a spatula or knife, smooth the top, and using the 1¼ cups of crumbs you have set aside, sprinkle these on top of the whipped cream/crumb mixture.

Your finished cake will look like this:


The inside of the cake morphs into a creamy, mousse-like filling. Like a good wine, this cake ages well; it also travels well, and all told, is my definition of cake perfection. I'm at the point where I don't even want to try another recipe, at the risk of being disappointed. This one's a "keeper", as the saying goes!

Try it, I think you'll like it!

Sunday, March 16, 2008

Bébé Pepés - Our Little Skunk Babies


So, we're pretty forgiving people when it comes to animals. We don't turn away strays, which is how we came to own Howard, and Schatzie and Baby Grey and BobCat and Cooper. That's our menagerie.

We also had a skunk, which some of you might be grossed out by. But I am going to ask you to put your aversions aside, if only for a moment, and listen to my story.

Skunks have every right to claim where they want to live, in my optimistic "tread lightly" philosophy, which is why we put up with one living under one of our barns. This was all good and fine, until Cooper came along. Cooper is the quintessential Border Collie / Labrador mix, and loves kitties! Unfortunately, Cooper's first encounter with the skunk didn't go over very well, nor did his second since he's not a quick learner. I am now a pro at de-skunking dogs, so if you're interested, listen up: there is but ONE product that works, and it's called Thiotrol made by a company called Vet Solutions. Ask your vet to order some. You'll be glad to have this product on hand late one Sunday night, because we all know dogs get skunked when the pharmacy's closed. Skunks know. (For those of you who can't get this product, buy 1 litre (roughly a quart for you imperialists) of Hydrogen Peroxide 3%, mix with 1/4 cup baking soda, and add 1 tablespoon liquid dishwashing soap. Ivory works well to mask the odor. Mix this only when ready to use, and remember to avoid your pet's eye area.)

I used to keep cat food in the barn, in a Rubbermaid container I used to tie up high over a beam with a bungee cord. Even I had trouble getting the damn thing down, but not Mama Skunky. In her last week, something like 10 pounds of cat food went missing. The old girl was stock-piling it. Then one unfortunate morning, I found Mama Skunk dead by the side of the road. I walked over to her body, noticed her teats and bulging stomach, and wondered if she'd had her babies already.

I sent Eric on a recon mission - check under the shed using the digital camera, to see if her babies were underneath. Now, the clearance under the barn is minimal, to say the least. Just enough room to fit your arm in, or for a cat or skunk to crawl into. Eric shot a few photos, downloaded them, enlarged them, and confidently gave me the all-clear. Ha.

About a week later, I was innocently sitting outside when a strange noise caught my attention. From under the barn appeared not one, not two, but FIVE baby skunks!

Now, you haven't lived until you've seen a baby skunk. If you think kittens are cute, well, I have news for you. Baby skunks take the cake:


I rest my case:


Well, if that's not the cutest thing you've ever seen, there's no hope for you.

So, you're asking, what do you feed them, what do they drink, where do they go, and do you still have them?

First things first: I gave them Friskies salmon tinned cat food, which the cats didn't like. I figured I'd give it a try and they loved it. I supplemented this with regular milk, and tried to give them fruits, but they weren't interested. We never touched them, because we didn't want them to get too used to humans. What's really amazing is they have terrible eyesight, but a wicked sense of smell. Sometimes, I'd hide their food and watch them find it. It was really amazing to see. They would also run to Schatzie, our grey mama cat, when they got nervous. Maybe with their poor eyesight, they thought she was their Mom? It only makes sense to me.

Observing these skunks was a great experience. We'd literally sit around and wait for them to emerge, mind you, it never took long once you put food out for them. Even Cooper got used to skunks, and would watch diligently during feeding times.

What's really neat is they're all different. There was one whose white was more yellow, 2 were bigger, 3 were smaller, and all had different stripes. Some were more intrepid, others more shy. We watched them grow bigger and enlarge their territory. You never knew where they'd turn up, but one thing was for sure: they never sprayed unless provoked. Eric did end up getting skunked once, but that was it. He recovered. And I'm sure it was his fault.

We spent the summer watching the skunks grow up, and one by one, they disappeared from the nest. We were hoping that one would return to the fold, but we remain skunk-less for now. Maybe one day, we'll get lucky and some skunk will choose our barn as its home again. Until then, we remember our baby skunks with lots of fond memories, feeling really privileged for having had the pleasure of observing them.

Is it nearly Spring?


No, Virginia, it's not spring yet. Unfortunately, we're still stuck under several feet of snow here in Quebec. The above picture is of my garden shed, taken in May of 2006. To think that it will look like that in about 6 weeks' time in unfathomable, since everything is still under a glacial layer of snow.

What's funny about the garden shed is the number on the door: number 7. For some obscure reason, all the out-buildings on our farm have numbers on them. It's not enough to say, "I'm going to the wood shed", no, some organizational guru decided to put numbers on all the sheds. So the wood shed is number 4, the chicken coop is number 6, the garden shed is number 7, and so on. The person whose turn it is to go get firewood simply calls out, "I'm going for the prize behind door number 4". It's like our own little code. But it still puzzles me why anyone would bother to number the barn and shed doors. Maybe there was a sale on numbers at Canadian Tire?

Maybe this summer we'll tackle fixing it up a bit. I'd love to see a copper roof on it, but that's a bit of a long shot. I plan to plant my vegetable garden near here this summer, so let's keep our collective fingers crossed that my gardening plans bear fruition.

In the interim, I leave you with this:


Easy Steps to Create Your Very Own Moat™

Part I - Summer 2004

So, we're pissed. We've (read: Eric's) nearly finished the downstairs, major renovations and paint and all . Okay, so we're still living with plywood floors, but still, the house isn't condemned anymore. And then we notice The Crack. Not just any crack, but a long fissure in a perfectly renovated wall. And then we notice another, and yet another. Eric and I look at each other and know, in our hearts, what needs to be done: the foundation has to be renovated.


In the general scheme of things, the outside of the house was next on the agenda of The Amazing Renovation after the inside was finished. But The Crack changed all that. No point in labouring long and hard inside, only to have cracks appear in the drywall overnight because the foundation was heaving.

So, one of the first things to remember in renovating and restoring a house to it's former glory is this: the house will tell you what it wants done, all you need to do is listen and react. I know, it sounds so simple.

This is how we came to own our Very Own Moat.


Old houses are obviously built on old foundations. Remarkably, amazingly, these old field-stone foundations have survived persistent cycles of freezing and thawing season after season. You gain new respect for our fore-fathers when you've really seen how old houses were built. The cornerstones are huge and perfectly chosen and placed. How all this was managed before the tractor age remains a testament to the perseverance of our ancestors. Where some people have a hard time hanging a picture straight, these builders were living in abysmal conditions, building in inclement weather, and didn't have a warm bath and fresh clothes at the end of a laborious day.

Eric toiled long and hard at restoring our old field stone foundation to it's former glory, and here's how he did it, moat and all.

A field stone foundation is exactly that: field stone and mortar to hold it all together. Our local field stone is called grès de Potsdam which has a tell-tale pinkish tint to it. On average, the foundation is roughly four to five feet thick, and about five feet high. There is no footing, simply well fitting stones piled one atop the other and held in place with mortar. The sill plate is placed on top of this wall, with a metal barrier under it to prevent rotting. That's it, at least that was it, until Eric came on the scene.

The summer kitchen foundation was renovated about 15 years ago. The old foundation was excavated, a form was placed, the concrete was poured, and voilà, insta-foundation. It's nice in theory, but not so nice in practice and I'll get to the whys later.

The main part of the house was a different story. In our crawl space, the wooden beams (essentially, tree logs complete with their bark as you can see in the photo below, upper left corner) were reinforced with metal I-beams that were supported by metal posts that in turn are supported by concrete footings.
Essentially, what kills old foundations are 1) water, and 2) cold. In preventing water from reaching your foundation, you need a good french drain and water-proofing, and to keep the cold from touching your foundation, you need proper insulation. The insulation needs to be placed on the OUTSIDE of your foundation, not inside your crawlspace, and proper drainage AWAY from your foundation. I'll explain what we did:


The first summer (it took three...), we excavated around two of three sides of the summer kitchen, removed the old french drain that went no where, and placed 2" polystyrene foam on the existing foundation wall with expanding polyurethane foam for a tight fit.

Here are a few handy tips: when foaming, wear rubber gloves. The comment on the foam tin says "foam will wear off with time". Heed the warning. You can clean your tools with lighter fluid, so buy 2 bottles while you're at it. Your foam gun will need to be cleaned profusely. Use the lighter fluid, and those bamboo shish-kebab skewers both you and I know you have rolling around a kitchen drawer that you never use. To prevent your glue gun from blocking while in use, find the longest screw you can find that fits the tube tightly, and guard it with your life. In fact, use a scrap piece of polystyrene foam as a holder you can jam the screw into, and you can thank me later. Olfa box-knives come with several types of blades, so go ahead and buy the LBB blades in the black box. They cost more, but you'll get more life out of them. And if you're like me and jam the blade into your leg by accident, you'll appreciate the clean cut once the scar heals. So will your surgeon. What the heck - go ahead and get your tetanus shot while you're at it, as well.

You'll need a good straight edge, a carpenter's square and levels. We like the Stabila brand, a really nice but not so cheap level. But you get what you pay for, and in this case, you get more.


You'll notice that while the adhesive foam is curing, you need to keep the foam panels on tight. Just gather every pole from every broom, rake and like instruments, and jam away, using a scrap piece of foam to prevent damage. The foam cures within an hour or so, and then they can be removed.

You'll also need to add a french drain around the perimeter. Here's how:


Create a solid, straight base for the drain. In our case, we used sand. The french drain needs to be wrapped in landscape fabric to prevent it from clogging. In the above photo, you can see that the drain leads to a cylinder. Inside this cylinder is a sump-pump that pumps the collected water from the french drain out to the ditch in front of our house. That's how we get rid of our water.
 
On top of this landscape fabric wrapped french drain you need to place gravel to promote good drainage and keep the whole shebang from moving.


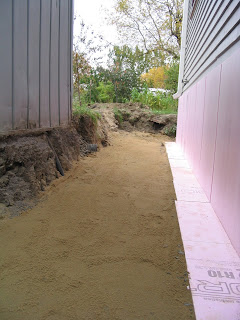
In the above photo, the pink foam insulation covers both the foundation and footing, since there was a footing here. The gravel is on top of the french drain, and the sand beside it will make the perfect base for more pink foam insulation. Using this method, you can rest assured that no frost will reach your foundation, and your house will not move. Ours hasn't, since we've insulated and drained it, that is.

On top of this, we placed 4' sheets of foam insulation, and a polyethylene barrier glued on to the foundation with foam wall adhesive. The end result looks something like this:


At this stage, we're finally ready for back-filling. That's the easiest, and most fulfilling part. We'll get to finishing what's above ground later.

Oh. But what about the moat? We'd love to add this wonderful water feature to our own lovely property, you might be thinking. Well...it's simple. Just excavate your foundation and pray hard for torrential rain. That's all there is to it. Enjoy.

(And for the curious among you, the antidote to a moat is simple: you see the pail in the moat photo? Well, it's just an ordinary 5 gallon pail we drilled 325,279 holes into with an 1/8" bit, and submerged. Into said pail we placed a sump pump. Pump away, and all you're left with is mud. And you think I call our property Muddy Acres for nothing, yea of little faith!)

It all starts with the septic tank...

Why is it, when you buy an old house, the shit tank is invariably first thing to fail?

Actually, in our case, it was the second thing to fail, since the first thing to fail was the well valve. That's simple enough, though. If you know where your well is located, that is. Thankfully we have a wonderful neighbour who used to live in our house many moons ago, as a small child, who was willing, able, and capable of finding the old well. Anyone can tell stories and point fingers, but Mr. Lefebure was really able to pin-point it. Fixing a well valve is not really an issue, providing you can find it, that is. It's simply a matter of digging, which gives one the opportunity to see heavy equipment dangerously close to the picture window in the kitchen, and also see copious amounts of mud in places where there used to be a driveway. But it's in the past, and precedes digital photography, so all that's left are memories, and real photos creatively assembled in an album we laugh over. Mostly. Sometimes we cry too, but then they're tears of joy in knowing we'll never have to go there again. May the well valve be one of those places.

But I digress. We're here for the septic tank. And what a tank it was! When it was finally hauled away, a process that took far too long, I actually walked to the end of the driveway and waved. For a very long time. Probably longer than was appropriate, but then again, the shit tank saga was an entire tome in our lives.

I think the dog noticed it first. The bubbly, slimy, stinking mess. Let's face it: we were in denial, okay? And denial is not a river in Egypt, as the saying goes, no, it's a river of shit right in our very own back yard. Our first tip-off was the septic tank lid, which was curiously made of plywood. Lesson number 1) Beware of septic tanks bearing plywood lids. During the home inspection, Eric was assured the septic tank would "last forever", and I'm sure it would, just not in its vocation as a septic tank. Our first step was to empty the damn thing, which is, once again, simple enough since we're not actually doing it. It's easily accessible, and the shit truck can even stay conveniently parked on the road. Keep that in mind when you're designing your new home and yard.


So this is what we were dealing with. It wasn't leaking, it wasn't overflowing, it just wasn't working, that's all. If you're very perceptive, you've also noticed the tree in the picture. Here's a helpful hint for you new homeowners, those not yet fluent in septic-ese and leads me to lesson number 2) Trees DO NOT belong on top of septic tanks, nor anywhere near your drainage field. Capiche? This is the stuff septic nightmares are made of.

Not ones to do things half-way, we installed not one, but two, yes TWO tanks. Remember I mentioned someone was anal ? Well, I wasn't joking.
Ain't she a beaut? I swear, you haven't lived until you've watched a shit tank expertly being lowered into the ground. The level of satisfaction you feel...simply cannot be described. I can wax philosophical about this ad nauseum, but suffice it to say it's One of the Great Moments in Home Renovation. Being able to flush one's toilet with the knowledge that, several thousand dollars later, one's eco-conscience is clear is a great feeling.

But we're not done yet! And you, the uninitiated, thought that was the end of my story! Not even close! Apparently, the town doesn't like our septic tanks. Also apparently, they don't have an option, since there is an entire development near our house with non-conforming shit tanks. We're looking at options and buying stocks in our local septic tank cleaning company, since we're now emptying our shit tanks with an alarming frequency, since we don't have a drainage field! In this day and age of environmental wisdom and know-how, you'd think the government has a plan, but they don't! Some solutions are unacceptable, and our only legal option (that shall remain nameless), was. We're not into installing something that resembles a giant kitty-litter box in our back yard. No way. In the meantime, the system we're looking at was approved by the government, and here's what was done:

A company called Bionest Technology retrofitted the secondary tank, and once filled with their proprietary media, the secondary tank becomes a sort of breeding ground of good bacteria which helps break down all the coliforms and bad stuff lurking in the septic tank effluent. From this secondary tank, which is aerated to increase the breakdown and efficiency, the waste water goes to a tertiary tank (read: more heavy equipment, more mud) where a Trojan Technologies UV system does it's job.
The UV system is installed in the round tank above. Very simple in it's operation, the UV tank essentially disinfects the remaining waste water before it's discharged into the ditch. A high-level float-type alarm notifies us of any problems, as does another alarm if the UV light burns out. The system is efficient, clean and takes up less space than your regular drainage field. In our case, the clay in our local area does not permit us to use a standard leach field, since clay is impermeable, hence the above fiasco.

All said and done, here's a view of the entire system:

Note the precisely laid PVC drainage pipe. The treated waste-water is pumped to the ditch from here. The water gets tested once a year, and our coliform count is so low, and the water so clear that some municipalities might be jealous. Now if only local laws would permit me to water the lawn with it instead of discharging it, the system would be perfect.

That, my friends, is how Muddy Acres got it's name. And maybe one day I'll own a lawn...maybe one day in the near future. A girl can always dream, can't she?

La vieille dame


Welcome to our Threesome!


Hello and bonjour! My name is Ann, my husband is Eric, and we are owned by a house we like to call "la vieille dame", or the old lady. We like to treat her well which is why this blog was created, among other things. We like to think we're quite innovative and creative with regards to looking after her and renovating her, and we'd like to share our experiences with you.

Our interests are varied: I'm into knitting, cooking, baking, my dog and cats, and pretty much everything and anything in and around the house and garden. Can you tell I don't get out much? Oh, I should probably mention Eric in that sentence too, because he's the reason I'm here, n'est-ce pas? My focus varies with the seasons, and this spring I will be trying my hand at carving a vegetable garden out of the landscape. I'm gonna make the 100 Mile Diet the 50 Yard Diet. Top that! Right now it's still wood-stove season, so I tend to hunker down and knit or read.

Eric is into planes, boats, cars, bikes, pretty much anything transportation-related, and of course, home renovation. Eric will try his hand at pretty much anything - and when he wraps his mind around something, watch out!

We are both curious as hell, love to read and research, and basically like to find the best ways of doing some uncommon things, and become pros at stuff we'll probably never get a chance to do again. Did I mention Eric is very, er, particular, about home renovation, which is why the road we're on is very, very long?

Let me show the way!
Related Posts Plugin for WordPress, Blogger...