So, we're pissed. We've (read: Eric's) nearly finished the downstairs, major renovations and paint and all . Okay, so we're still living with plywood floors, but still, the house isn't condemned anymore. And then we notice The Crack. Not just any crack, but a long fissure in a perfectly renovated wall. And then we notice another, and yet another. Eric and I look at each other and know, in our hearts, what needs to be done: the foundation has to be renovated.
In the general scheme of things, the outside of the house was next on the agenda of The Amazing Renovation after the inside was finished. But The Crack changed all that. No point in labouring long and hard inside, only to have cracks appear in the drywall overnight because the foundation was heaving.
So, one of the first things to remember in renovating and restoring a house to it's former glory is this: the house will tell you what it wants done, all you need to do is listen and react. I know, it sounds so simple.
This is how we came to own our Very Own Moat.
Old houses are obviously built on old foundations. Remarkably, amazingly, these old field-stone foundations have survived persistent cycles of freezing and thawing season after season. You gain new respect for our fore-fathers when you've really seen how old houses were built. The cornerstones are huge and perfectly chosen and placed. How all this was managed before the tractor age remains a testament to the perseverance of our ancestors. Where some people have a hard time hanging a picture straight, these builders were living in abysmal conditions, building in inclement weather, and didn't have a warm bath and fresh clothes at the end of a laborious day.
Eric toiled long and hard at restoring our old field stone foundation to it's former glory, and here's how he did it, moat and all.
A field stone foundation is exactly that: field stone and mortar to hold it all together. Our local field stone is called grès de Potsdam which has a tell-tale pinkish tint to it. On average, the foundation is roughly four to five feet thick, and about five feet high. There is no footing, simply well fitting stones piled one atop the other and held in place with mortar. The sill plate is placed on top of this wall, with a metal barrier under it to prevent rotting. That's it, at least that was it, until Eric came on the scene.
The summer kitchen foundation was renovated about 15 years ago. The old foundation was excavated, a form was placed, the concrete was poured, and voilà, insta-foundation. It's nice in theory, but not so nice in practice and I'll get to the whys later.
The main part of the house was a different story. In our crawl space, the wooden beams (essentially, tree logs complete with their bark as you can see in the photo below, upper left corner) were reinforced with metal I-beams that were supported by metal posts that in turn are supported by concrete footings.
Essentially, what kills old foundations are 1) water, and 2) cold. In preventing water from reaching your foundation, you need a good french drain and water-proofing, and to keep the cold from touching your foundation, you need proper insulation. The insulation needs to be placed on the OUTSIDE of your foundation, not inside your crawlspace, and proper drainage AWAY from your foundation. I'll explain what we did:
The first summer (it took three...), we excavated around two of three sides of the summer kitchen, removed the old french drain that went no where, and placed 2" polystyrene foam on the existing foundation wall with expanding polyurethane foam for a tight fit.
Here are a few handy tips: when foaming, wear rubber gloves. The comment on the foam tin says "foam will wear off with time". Heed the warning. You can clean your tools with lighter fluid, so buy 2 bottles while you're at it. Your foam gun will need to be cleaned profusely. Use the lighter fluid, and those bamboo shish-kebab skewers both you and I know you have rolling around a kitchen drawer that you never use. To prevent your glue gun from blocking while in use, find the longest screw you can find that fits the tube tightly, and guard it with your life. In fact, use a scrap piece of polystyrene foam as a holder you can jam the screw into, and you can thank me later. Olfa box-knives come with several types of blades, so go ahead and buy the LBB blades in the black box. They cost more, but you'll get more life out of them. And if you're like me and jam the blade into your leg by accident, you'll appreciate the clean cut once the scar heals. So will your surgeon. What the heck - go ahead and get your tetanus shot while you're at it, as well.
You'll need a good straight edge, a carpenter's square and levels. We like the Stabila brand, a really nice but not so cheap level. But you get what you pay for, and in this case, you get more.
You'll notice that while the adhesive foam is curing, you need to keep the foam panels on tight. Just gather every pole from every broom, rake and like instruments, and jam away, using a scrap piece of foam to prevent damage. The foam cures within an hour or so, and then they can be removed.
You'll also need to add a french drain around the perimeter. Here's how:
Create a solid, straight base for the drain. In our case, we used sand. The french drain needs to be wrapped in landscape fabric to prevent it from clogging. In the above photo, you can see that the drain leads to a cylinder. Inside this cylinder is a sump-pump that pumps the collected water from the french drain out to the ditch in front of our house. That's how we get rid of our water.
On top of this landscape fabric wrapped french drain you need to place gravel to promote good drainage and keep the whole shebang from moving.
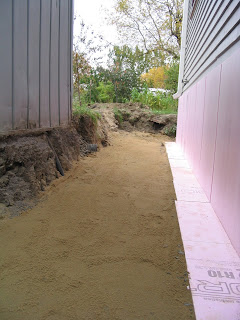
In the above photo, the pink foam insulation covers both the foundation and footing, since there was a footing here. The gravel is on top of the french drain, and the sand beside it will make the perfect base for more pink foam insulation. Using this method, you can rest assured that no frost will reach your foundation, and your house will not move. Ours hasn't, since we've insulated and drained it, that is.
On top of this, we placed 4' sheets of foam insulation, and a polyethylene barrier glued on to the foundation with foam wall adhesive. The end result looks something like this:
At this stage, we're finally ready for back-filling. That's the easiest, and most fulfilling part. We'll get to finishing what's above ground later.
Oh. But what about the moat? We'd love to add this wonderful water feature to our own lovely property, you might be thinking. Well...it's simple. Just excavate your foundation and pray hard for torrential rain. That's all there is to it. Enjoy.
(And for the curious among you, the antidote to a moat is simple: you see the pail in the moat photo? Well, it's just an ordinary 5 gallon pail we drilled 325,279 holes into with an 1/8" bit, and submerged. Into said pail we placed a sump pump. Pump away, and all you're left with is mud. And you think I call our property Muddy Acres for nothing, yea of little faith!)


No comments:
Post a Comment